So, you’ve finally decided to start a WordPress blog.
You’re excited… motivated… maybe even holding a fresh cup of coffee, ready to pour your ideas into the world.
But then reality hits.
Do you pick WordPress.com or WordPress.org?
Which hosting is “actually good”?
Why does every tutorial assume you already know what a permalink is?
And the biggest nightmare of all, what on earth do you write as your first blog post?
If this sounds familiar, trust me, every blogger, content marketer, and WordPress user has been exactly where you are.
Staring at the screen.
Googling things like “best hosting for beginners.”
Wondering why this whole blogging thing looks so easy for everyone else.
The good news?
It does get easier, especially when you know the right steps and use the right tools to remove the frustrating parts (YES, including writing).
In this guide, you’ll get a clear, beginner-friendly roadmap on how to start a WordPress blog and launch your blogging website, from choosing your niche to writing your first post with AI-powered support. Consider this your step-by-step journey from confusion to confidence.
Let’s begin.
Step-by-Step Process to Start Your WordPress Blog
Starting your blog doesn’t have to feel complicated or overwhelming. Once you understand the core steps, the entire process becomes simple, structured, and surprisingly enjoyable.
In this section, we’ll walk through each stage from choosing your niche to publishing your first post, in a clear, beginner-friendly order. Just follow along, take it one step at a time, and by the end, you’ll have a fully functional WordPress blog ready to share with the world.
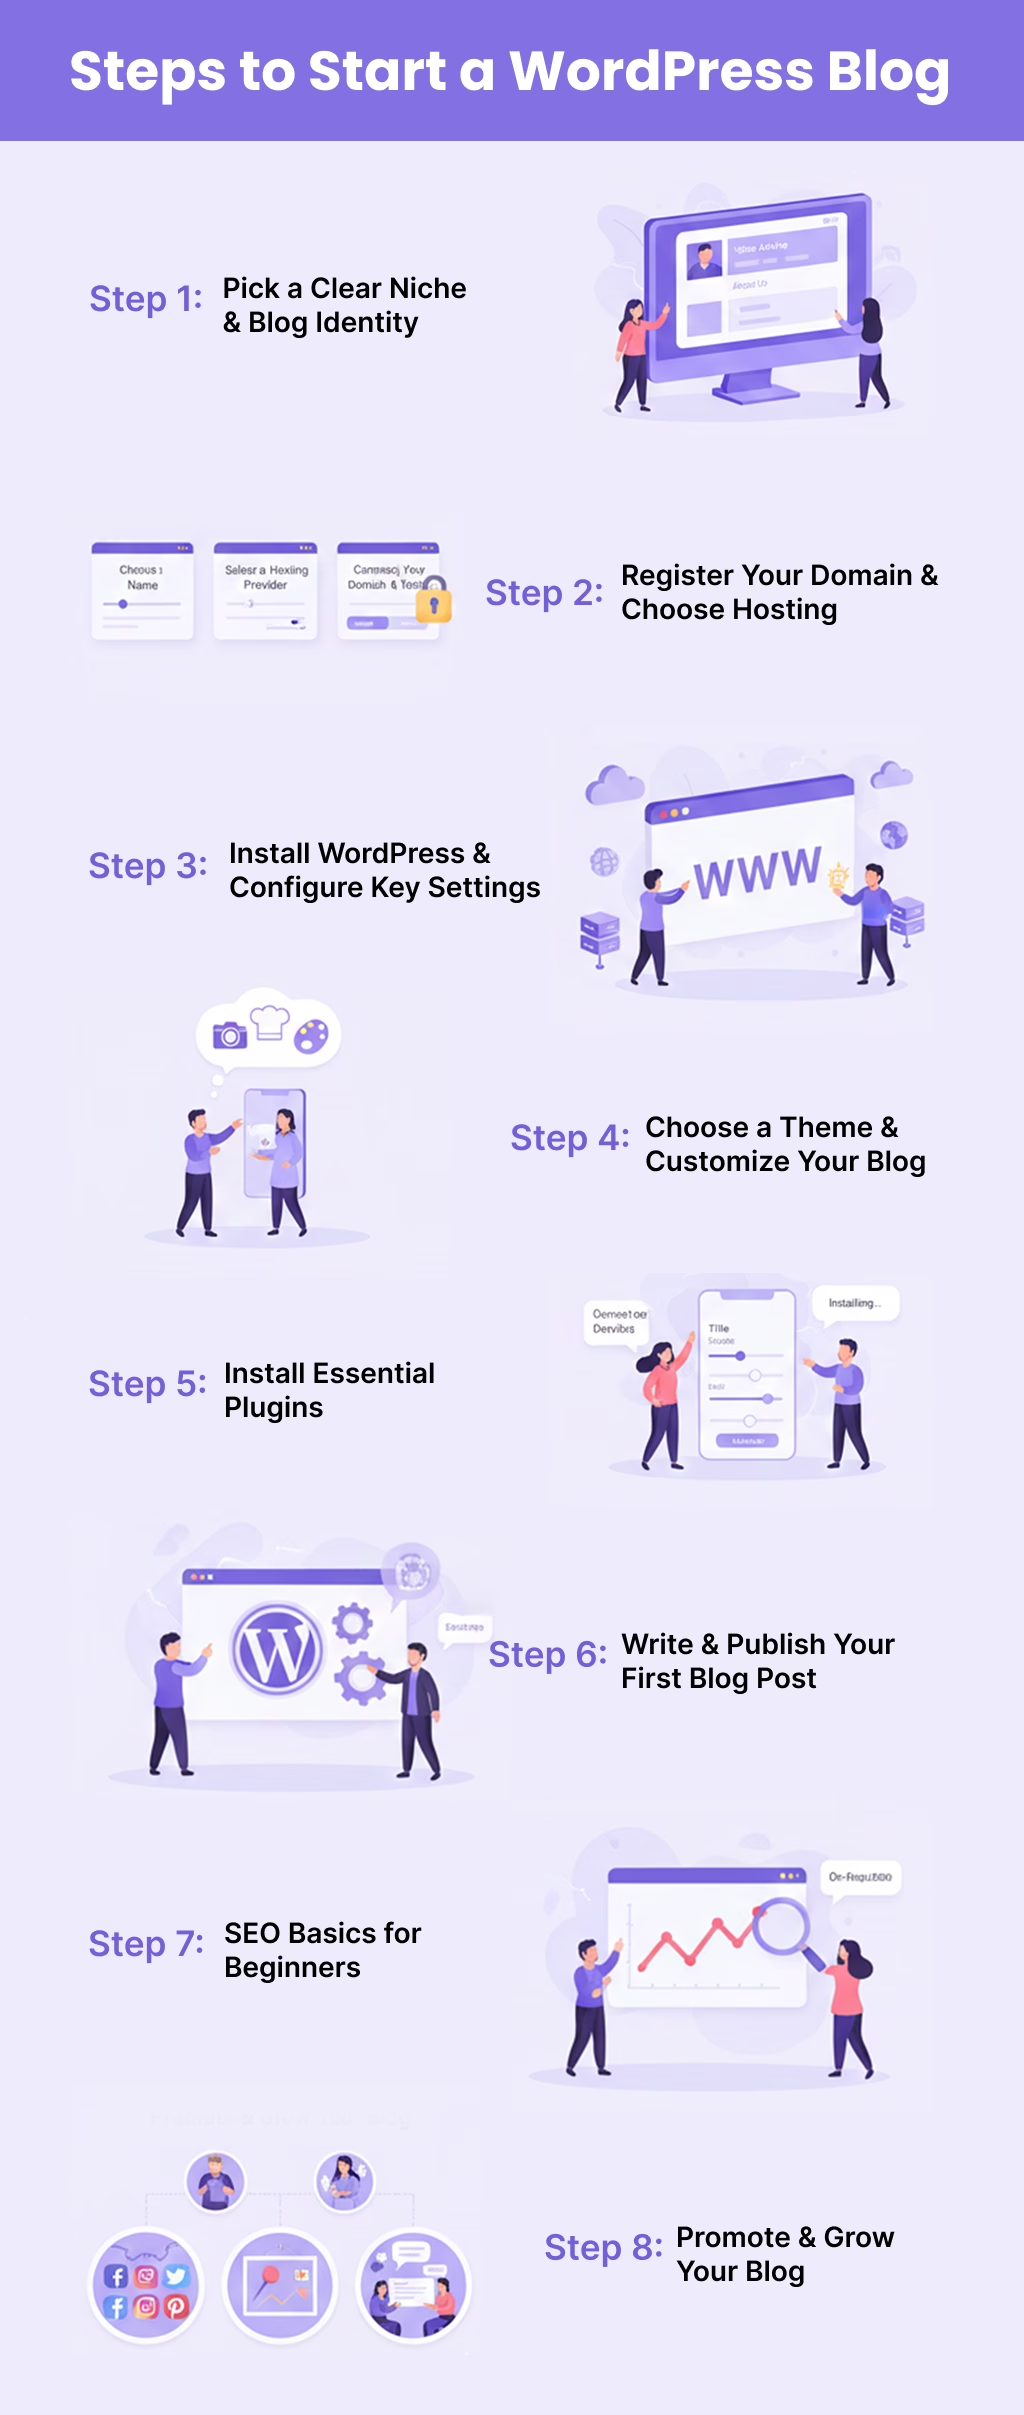
Step 1: Pick a Clear Niche & Blog Identity
Before you install WordPress, choose a theme, or brainstorm blog post ideas, you need one thing: A clear niche and a strong blog identity.
Most new bloggers skip this step, and later wonder why writing feels overwhelming or why growing a WordPress blog becomes so complicated.
Think of your niche as the core purpose of your blog. It guides your content strategy, helps you attract the right audience, and makes it easier for Google to understand what your site is about.
Here’s a simple 3-step method (beginner-friendly):
1. how-to-start-wordpress-blog
Ask yourself:
- What topics can I talk about for months without getting bored?
- What skills or experiences do I already have?
- What do people often ask me for help with?
Example:
Instead of “travel,” narrow it to “budget travel for students in Southeast Asia.”
2. Check if the Niche Has an Audience
To avoid writing into the void:
- Search the topic on Google
- Look at existing WordPress blogs in that niche
- Check if people ask questions about it on social platforms or forums
If others are creating content on it, that’s a good sign; there’s demand.
3. Make Sure You Can Create Multiple Blog Post Ideas
Your niche should naturally generate content ideas.
Ask yourself:
“Can I write at least 20 topics on this niche?”
If yes → great niche.
If not → narrow or expand slightly.
Define Your Blog Identity (Your Brand Personality)
Once you have a niche, define your blog identity, which includes:
- Tone: Friendly, expert, humorous, inspirational?
- Target audience: Beginners, professionals, students, busy entrepreneurs, etc.
- Unique angle: What makes your WordPress blog different?
Example identity:
“A beginner-friendly WordPress blog teaching moms how to start a blog and make money from home, using easy tutorials and simple tools.”
Pro Tip:
Your niche doesn’t have to be perfect. It just needs to be narrow and clear enough to get started. You can always refine as you grow.
Step 2: Register Your Domain & Choose Hosting
Once you’ve picked a niche, it’s time to give your blog a real home on the internet. This step includes two essentials:
- Your domain name
- Your hosting provider
Think of it like building a house:
- Your domain is the street address
- Your hosting is the land where you build your WordPress website
And the best part? Setting these up is easier than it looks, even if you’re a total beginner.
1. Choose a Domain Name
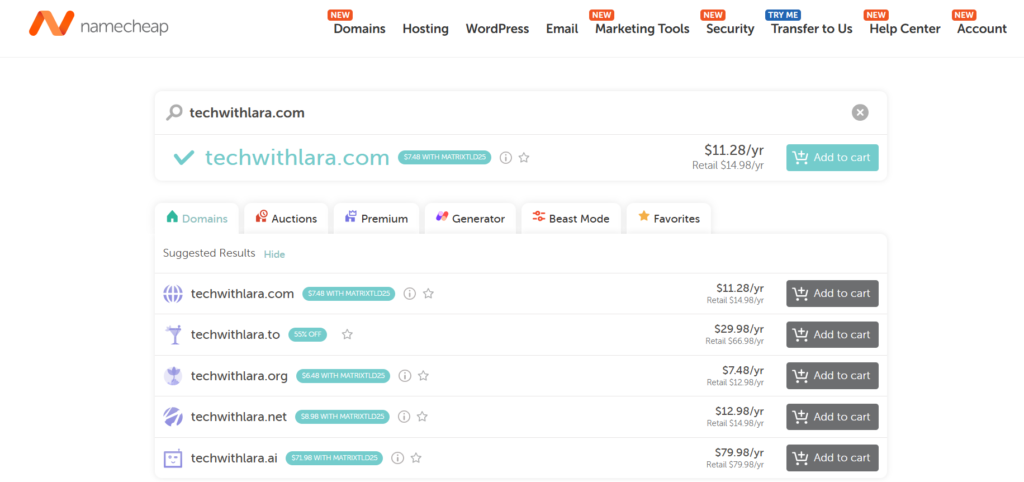
Your domain name is how readers will find you. So make it:
- Simple
- Memorable
- Easy to type
- Branded around your niche
Tips for Choosing a Good Domain:
- Keep it short (under 15 characters if possible)
- Avoid numbers or hyphens (confusing when spoken)
- Choose a .com if available
- Use keywords only if it feels natural
- Make sure it matches your blog’s identity
Examples:
- healthyhabitsdaily.com
- budgettravelmom.com
- techwithlara.com
If your exact name is taken, try adding simple modifiers like “guide,” “hub,” or “today.”
2. Select a Hosting Provider
Now that you have a domain idea, you need web hosting, the service that stores your website files and keeps your WordPress blog online 24/7.
If domains are the address…
Hosting is the actual house your blog lives in.
Here are the essentials you should check before purchasing hosting:
- One-click WordPress installation (saves beginners LOTS of time)
- Free SSL certificate (important for security + SEO)
- Fast server performance (affects page speed and rankings)
- Good uptime (99.9%)
- Customer support is available round the clock
- Affordable introductory pricing
Most hosting companies offer bundles like:
Domain + Hosting + SSL + Email → perfect for new bloggers.
Popular and reliable WordPress hosting options include Namecheap, Hostinger, Bluehost, etc.
3. Connect Your Domain & Hosting
Here’s the good news:
Most hosting providers automatically connect your domain when you buy both from the same company.
But if your domain is purchased separately, you’ll need to point your DNS to your hosting. Don’t worry, hosting support usually does this for free.
Once your purchase is complete, Namecheap will send you an email containing your account login details. Use these credentials to access your Namecheap dashboard, where you’ll manage your domain, hosting settings, and proceed to install WordPress through their easy-to-use hosting panel.
Pro Tip:
Try choosing a hosting plan that includes free SSL + automatic backups.
Step 3: Install WordPress & Configure Key Settings
Now that you’ve secured your domain and hosting, it’s finally time to bring your WordPress blog to life. This part might sound technical, but don’t worry, it’s surprisingly simple, especially with today’s beginner-friendly tools.
Think of this step as assembling the foundation of your blog. Once WordPress is installed and configured properly, everything else becomes easier, from writing blog posts to improving SEO.
Let’s walk through it together.
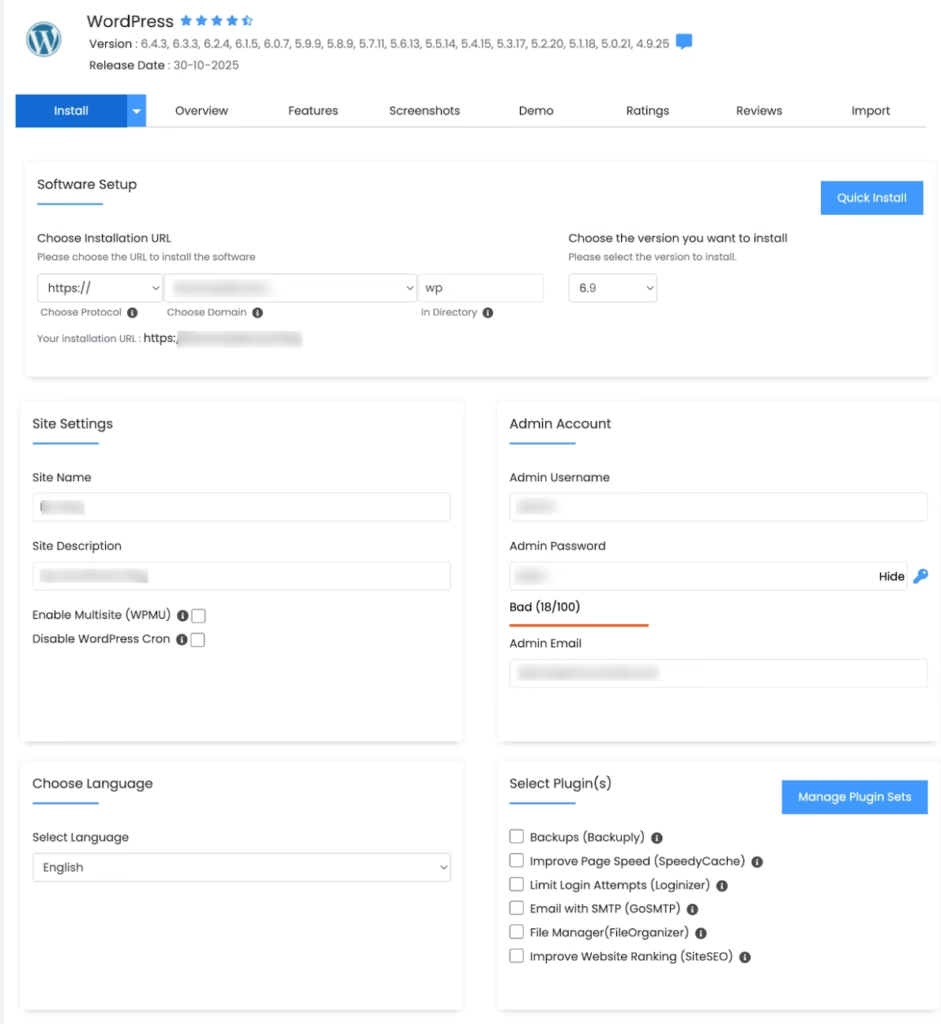
Most hosting providers now offer one-click WordPress installation, which means you don’t need to manually upload files or deal with complicated settings.
How to Install WordPress
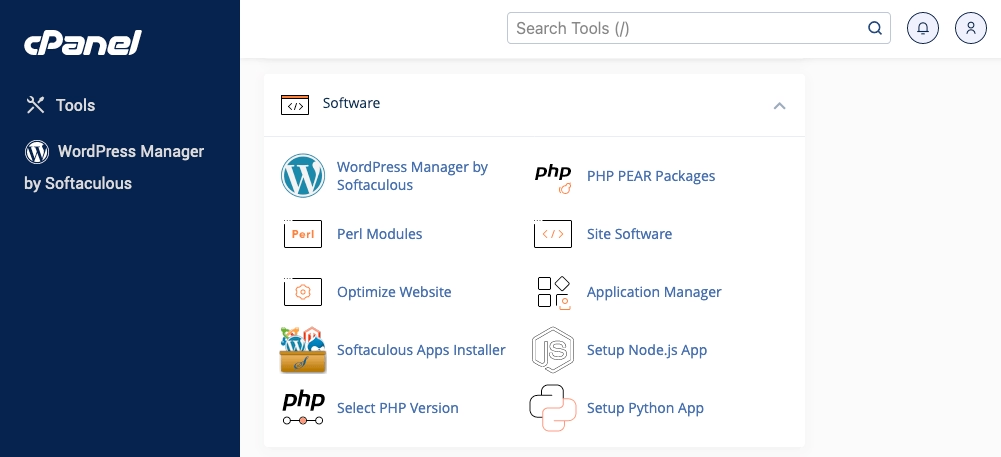
Depending on your hosting dashboard, you’ll see something like:
- “Install WordPress”
- “WordPress Auto Installer”
- “Set Up WordPress”
Tap it → choose your domain → click Install.
And within 10–20 seconds, your new WordPress site is ready.
After installation, you’ll get your admin URL:
yourdomain.com/wp-admin
This is where you’ll manage everything: posts, pages, plugins, design, and more.
The WordPress dashboard might feel intimidating at first, but once you understand the basics, it becomes incredibly intuitive.
Here’s what you’ll find:
- Posts: where you write blog posts
- Pages: for static content (About, Contact, etc.)
- Appearance: change your theme and design
- Plugins: add extra features
- Settings: configure your site preferences
Take a few minutes to click around. The more familiar you become, the easier your blogging workflow will feel.
Configure Essential WordPress Settings
Before you write your first blog post, adjust a few key settings. These help with SEO, performance, and overall blog structure.
1. Set SEO-Friendly Permalinks
Go to:
Settings → Permalinks → Select “Post Name.”
This turns your URLs into clean, readable formats.
Good example:
yourdomain.com/how-to-start-wordpress-blog
Bad example:
yourdomain.com/?p=125
Search engines (and readers) prefer the clean version.
2. Update Site Title & Tagline
Go to:
Settings → General
Add:
- Site Title (your blog’s name)
- Tagline (a short description of what your blog is about)
Example:
- Title: FitMoms Hub
- Tagline: Easy workouts and healthy living for busy moms
This helps with branding and indexing.
3. Set Timezone, Language & Reading Settings
Still in Settings, update:
- Timezone (important for scheduled posts)
- Language (default for your site)
- Reading settings (show a homepage or latest posts)
For most beginner blogs, showing Latest Posts is perfect.
4. Configure Discussion (Comment) Settings
Go to:
Settings → Discussion
Here you can:
- Enable comments
- Approve comments manually
- Reduce spam by requiring name + email
If you’re planning a community-focused blog, keep comments on.
WordPress comes with sample content like:
- “Hello World!” post
- “Sample Page”
Delete these to keep your blog clean and professional.
Pro Tip:
Take a moment to bookmark your WordPress login URL and save your admin password. These tiny steps will save you countless headaches later.
Step 4: Choose a Theme & Customize Your Blog
WordPress offers thousands of free and premium themes designed for every kind of blog, like travel, food, fitness, parenting, tech, reviews, and more.
Before installing anything, make sure your theme is:
- Lightweight & fast-loading (improves SEO)
- Mobile-responsive (over 60% of blog traffic comes from mobile)
- Customizable (logo, colors, fonts, layouts)
- Gutenberg/Block Editor compatible
- SEO-friendly
- Regularly updated
Here are some reliable, easy-to-use themes:
- Astra: blazing fast and flexible
- GeneratePress: lightweight and professional
- Kadence: beautiful templates + customization
- Blocksy: modern and optimized for speed
These themes are perfect for beginners and work seamlessly with page builders or the Gutenberg block editor.
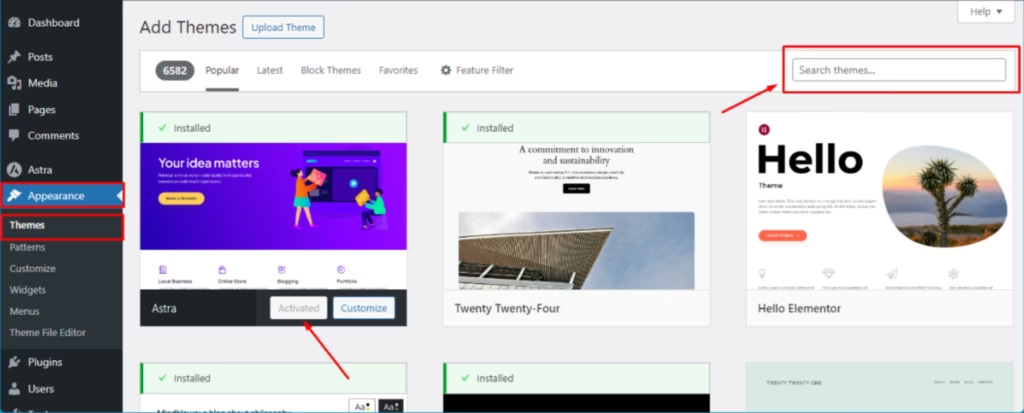
Install Your WordPress Theme
To install:
- Go to Appearance → Themes
- Click Add New
- Search for your chosen theme
- Click Install, then Activate
Within seconds, your blog will have a fresh new design.
Customize Your Theme
After activating your theme, click Customize under the Appearance menu. This opens the WordPress Customizer, a beginner-friendly interface where you can adjust your blog’s visual elements.
Here’s what you should update:
1. Upload Your Logo
Add a simple logo (or just use a text logo if you’re starting out).
2. Choose Your Brand Colors
Select two main colors that match your niche or brand personality.
Example:
- Lifestyle blog → warm neutrals
- Tech blog → bold blue or black
- Food blog → soft greens or reds
3. Update Typography
Pick clean, readable fonts.
Good combinations:
- Headings: Poppins / Montserrat
- Body: Lato / Open Sans
4. Set Up Your Header & Navigation Menu
Create your primary navigation items (Home, Blog, About, Contact).
5. Adjust Your Blog Layout
Choose:
- Sidebar vs. no sidebar
- Grid vs. list layout
- Featured images on/off
6. Set Your Homepage
Go to Settings → Reading
Choose:
- Your Latest Posts (recommended for new blogs)
or - A Static Homepage (if you’re building a brand-focused site)
Before publishing your first post, create the core pages your readers expect:
- About Page: who you are & what your blog is about
- Contact Page: allow readers/brands to reach you
- Privacy Policy: important for trust and legal requirements
These pages help make your blog look polished and credible.
A clean, simple, and fast theme performs FAR better than an overly designed one. Your content and user experience matter more than fancy visuals.
Step 5: Install Essential Plugins

Now that your WordPress theme and basic setup are done, it’s time to give your blog some superpowers. This is where WordPress plugins come in.
Plugins are like apps for your WordPress blog.
Want better SEO? There’s a plugin.
Need a contact form? Plugin.
Want your site to load faster, stay secure, or even write content with AI?
Yep, also plugins.
The best part? You can install all of this without touching a single line of code.
How to Install a Plugin in WordPress
First, let’s quickly walk through the basic process:
- Go to Plugins → Add New in your WordPress dashboard
- Use the search bar to find a plugin (e.g., “SEO”, “cache”, “contact form”)
- Click Install Now
- Then click Activate
That’s it, your plugin is now live and ready to configure.
Read more: How to Download Plugin from WordPress
Must-Have Plugins for a New WordPress Blog
To keep things simple, let’s focus on essential plugins every beginner should consider when starting a WordPress blog.
1. SEO Plugin (Help Google Understand Your Content)
An SEO plugin helps you optimize your blog posts for search engines so people can actually find your content.
Popular options:
These plugins help you:
- Add SEO titles and meta descriptions
- Optimize keywords in your content
- Generate XML sitemaps
- Improve on-page SEO structure
If you’re serious about growing traffic, an SEO plugin is non-negotiable.
2. Caching & Speed Plugin (Make Your Blog Load Faster)
Page speed is a ranking factor and an essential user experience. A slow blog = high bounce rate.
Popular caching plugins:
- LiteSpeed Cache
- WP Super Cache
- W3 Total Cache
These plugins:
- Store cached versions of your pages
- Reduce server load
- Help your WordPress site load faster for repeat visitors
3. Security Plugin (Protect Your WordPress Blog)
Even a small blog can be a target for bots or attacks. A security plugin adds extra protection.
Options include:
- Wordfence Security
- Solid Security (formerly iThemes Security)
These can:
- Block suspicious login attempts
- Scan for malware
- Strengthen your login security
4. Contact Form Plugin (Let People Reach You Easily)
You’ll eventually want readers, clients, or brands to get in touch, and that’s where a contact form plugin comes in.
Beginner-friendly choices:
- WPForms
- Contact Form 7
5. Image Optimization Plugin (Faster, Lighter Images)
Large, uncompressed images can slow down your WordPress blog significantly. Image optimization plugins fix that automatically.
Good options:
- Smush
- ShortPixel
They:
- Compress images without losing quality
- Reduce file size
- Improve page loading speed
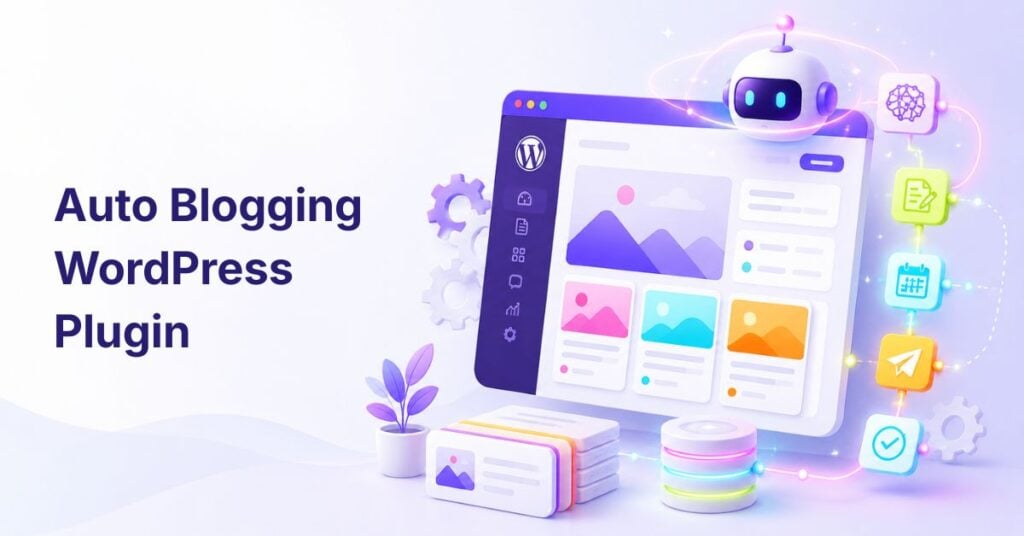
6. AI Content Writing Plugin (Write Blog Posts Faster & Smarter)
Here’s where your WordPress AI plugin shines.
Let’s be real:
Installing plugins is easy.
Writing content consistently? Not so much.
This is exactly why having an AI content writing tool inside WordPress is a game-changer, especially for new bloggers and busy content marketers.
With a WordPress AI plugin, you can:
- Generate blog post ideas based on your niche
- Create SEO-friendly outlines in seconds
- Draft long-form posts directly inside the WordPress editor
- Rewrite or expand sections for better clarity
- Adjust tone (conversational, professional, persuasive, etc.)
- Overcome writer’s block when starting a new post
Start with a small stack of essential plugins like SEO, cache, security, contact form, image optimization, and your AI writing tool.
As your blog grows, you can add more specific plugins (e.g., social sharing, table of contents, schema, etc.).
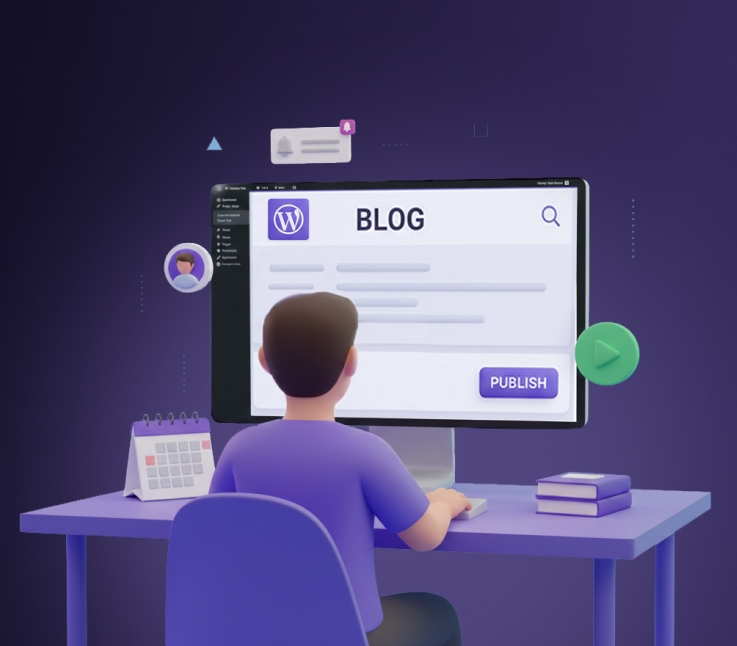
Step 6: Write & Publish Your First Blog Post
Your WordPress blog is set up, your theme looks clean, your essential plugins are installed…
Now comes the moment every new blogger both dreams of and dreads: writing your first blog post.

Don’t worry, we’ll walk through it step by step.
1. Accessing the WordPress Editor
Start by going to your WordPress dashboard and navigating to Posts → Add New. This will open the Gutenberg editor, where you’ll create your first blog post for your new WordPress blog.
2. Crafting Your Post Title
At the top, add your blog post title in the designated title area. Your title should be clear and compelling, such as “How to Start a WordPress Blog for Beginners (Step-by-Step)”. Make sure it tells readers exactly what they’ll learn and includes your main keyword naturally.
3. Outlining Your Content with Headings
Before writing the full content, use headings (H2, H3) to create a simple outline. For example:
- H2: Why Start a WordPress Blog
- H2: What You Need Before You Begin
- H2: Step-by-Step Setup
This makes your content easier to write and helps with SEO.
4. Writing Your Content (With or Without AI Help)
Use the main content area to start writing your post. If you’re using a WordPress AI writing plugin, you can generate an introduction, expand sections, or rewrite parts to sound more conversational. Add your personal insights so the content feels genuine and relatable.
5. Formatting for Readability
Break your content into short paragraphs and use headings, bullet points, and numbered lists to make it easy to skim. Use the toolbar to:
- Bold key phrases
- Add bullet points
- Create numbered steps
This keeps your “How to Start WordPress Blog” guide visually appealing and user-friendly.
6. Adding Images, Categories, and Tags
On the right sidebar, set a featured image that fits your topic, then choose a category like “Blogging Tips” and add relevant tags (e.g., WordPress blog, beginner blogging, blog setup). This helps organize your content and improves navigation.
7. Doing a Quick SEO Check
If you’re using an SEO plugin, add an SEO title and meta description, and make sure your main keyword appears naturally in the title, first paragraph, and a few headings. Don’t overstuff, focus on clarity and value.
8. Previewing and Publishing Your Post
Click Preview to see how your blog post looks on desktop and mobile. Once everything looks good, hit Publish.
Congratulations! Your first WordPress blog post is now live!
Step 7: SEO Basics for Beginners
Now that you’ve published your first blog post, it’s time to make sure people can actually find it. This is where SEO (Search Engine Optimization) comes in, one of the most important parts of learning how to start a WordPress blog the right way.
SEO might sound technical, but trust me, once you understand the basics, it becomes much easier to apply. Let’s break everything down so you can start growing your blog traffic from day one.
1. Optimize Your Blog Post with On-Page SEO
On-page SEO helps search engines understand what your content is about. It’s one of the fastest ways to make your blog more discoverable.
Key on-page SEO steps:
- Add your main keyword (“How to Start WordPress Blog”) naturally in your title, first paragraph, and a few subheadings.
- Use related LSI keywords, like WordPress setup, beginner blogging tips, blog SEO basics, etc.
- Keep your paragraphs short and scannable.
- Use a clear heading structure (H2, H3) to help Google read your content easily.
2. Write Compelling SEO Titles & Meta Descriptions
Your SEO title and meta description appear in Google search results, and they influence whether people click or scroll past.
- Keep your SEO title around 50–60 characters.
- Write a meta description that summarizes the post in 150–160 characters.
- Include your main keyword in both for better visibility.
Example Meta Description:
“Learn how to start a WordPress blog step-by-step with beginner-friendly tips, SEO basics, and setup guidance to grow your blog fast.”
3. Use Internal & External Linking Wisely
Links help Google understand your blog structure and improve user experience.
Internal Links
Link to other blog posts on your site.
Example:
If you later write “Best WordPress Themes for Beginners,” link it from this post.
External Links
Link to credible, relevant websites (e.g., WordPress.org, Google, SEO tools). This builds trust and gives readers valuable resources.
4. Optimize Your Images for SEO
Images don’t just make your blog look good; they also help with traffic if optimized properly.
Do this for every image:
- Compress the image (using Smush or ShortPixel)
- Add alt text describing what the image shows
- Use descriptive file names like: wordpress-blog-setup.png instead of IMG_2045.png
Alt text is important because it helps visually impaired users and improves your chances of ranking in Google Images.
5. Improve Your Page Speed & Mobile Experience
Google loves fast, mobile-optimized websites, and so do readers.
To improve speed:
- Use a caching plugin
- Compress images
- Choose a lightweight theme
- Avoid unnecessary plugins
To improve mobile usability:
- Test your blog on your phone
- Keep your design clean and responsive
- Avoid tiny fonts or cluttered layouts
Since over 60% of blog traffic comes from mobile, this step is essential.
6. Submit Your Blog to Google Search Console
Once your WordPress blog is live, let Google know it exists.
- Go to Google Search Console
- Add your blog URL
- Submit your sitemap.xml (your SEO plugin can generate one)
This helps Google crawl and index your site faster.
Don’t overthink SEO in the beginning. Focus on learning the basics, writing helpful content, and optimizing your posts as you go. As your blog grows, you’ll naturally understand more advanced strategies.
Step 8: Promote & Grow Your Blog
Once your WordPress blog is live and you’ve published a few posts, the next question naturally pops up:
“How do I get people to actually read my blog?”
This is where blog promotion comes in as an essential part of learning how to start a WordPress blog that new bloggers often overlook. Publishing is just the beginning; promoting your content is what truly helps your blog grow.
Let’s walk through the most effective beginner-friendly strategies.
1. Share Your Blog Posts on Social Media
Social platforms are free traffic machines if used the right way. You don’t need a huge following; consistency matters more.
Share your post on:
- Facebook groups (blogging, niche-specific communities)
- Twitter/X
- Pinterest (great for lifestyle, food, travel, etc.)
- LinkedIn (ideal for business, marketing, tech topics)
Tip: Add a short caption + a catchy hook to encourage readers to click.
2. Pin Your Blog Graphics on Pinterest
Pinterest works like a visual search engine. It can drive traffic long-term, even from older posts.
Steps:
- Create a pin-friendly image (1000×1500 px)
- Add your post title on the graphic
- Upload it to Pinterest and link to your blog post
Many beginner bloggers get 50–60% of their early traffic from Pinterest alone.
3. Join Blogging Communities & Forums
Being active in blogging communities helps you:
- Build relationships
- Get shares
- Learn from others
- Promote your content gently
Try:
- Reddit communities
- Facebook groups
- Niche forums
- Quora (answer questions + add your blog link when relevant)
4. Repurpose Your Blog Content
One blog post can become:
- A short Instagram reel
- A LinkedIn post
- A Pinterest pin
- A YouTube short
- An email newsletter
This helps you reach readers on multiple platforms without creating new content from scratch.
5. Build an Email List (Even as a Beginner)
Email is still one of the most effective ways to grow a blog.
Use tools like:
- MailerLite
- ConvertKit
- MailChimp
Send updates like:
- “New blog post is live!”
- “Weekly tips on starting a WordPress blog”
- “Behind-the-scenes insights”
A strong email list = consistent traffic.
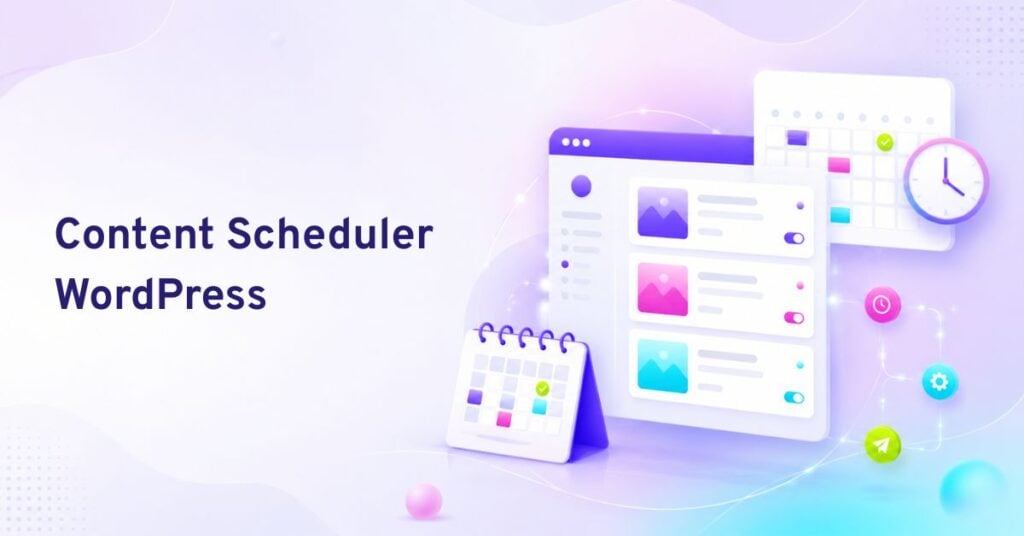
6. Publish Consistently (Your Secret Growth Weapon)
Search engines and readers both reward consistency.
According to blogging statistics, bloggers who publish consistently receive up to 3.5X more traffic than those who publish irregularly.
This is where having a WordPress AI writing plugin can be a huge advantage:
- Generate new blog ideas quickly
- Create outlines in seconds
- Write drafts without staring at a blank screen
- Maintain a weekly or biweekly posting schedule
Consistency becomes achievable, even with a busy schedule.
7. Update Older Posts Regularly
Google loves “fresh” content.
Every few months:
- Update outdated info
- Add new examples
- Improve formatting
- Insert updated keywords
This keeps your posts relevant and ranking.
Think of promoting your blog as part of your workflow, not an optional afterthought. Publishing brings your content to life, but promotion is what gives it an audience.
Bonus Tip: Make Money From Your Blog (Turn Your WordPress Blog Into Income)
Once you’ve learned how to start a WordPress blog and built a foundation with valuable content, you might ask the exciting question:
“How do I actually make money from my blog?”
The good news?
There are multiple beginner-friendly ways to monetize a WordPress blog—even if you’re just starting out and don’t have huge traffic yet.
Let’s walk through the most effective ones.
1. Earn With Google AdSense or Display Ads
One of the simplest ways to start earning is by placing ads on your blog.
How it works:
- You sign up for Google AdSense (or another ad network)
- Place the ad code on your site
- You earn money whenever visitors see or click on the ads
This is ideal for beginners because it’s easy to set up and requires no selling.
2. Affiliate Marketing (Recommend Products & Earn Commissions)
Affiliate marketing is one of the most popular and profitable ways to monetize a WordPress blog.
How it works:
- You recommend products or tools related to your niche
- Add affiliate links in your posts
- Earn a commission whenever someone makes a purchase using your link
Examples:
- A tech blog can promote hosting platforms or WordPress plugins
- A food blog can promote kitchen gadgets or recipe books
- A travel blog can recommend hotels or gear
Tip: Write detailed guides, comparisons, and reviews, they convert the best.
3. Sponsored Posts & Brand Collaborations
Once your blog grows a bit, brands in your niche may pay you to feature their products or write about their services.
Brands love partnering with niche blogs because:
- They get targeted exposure
- Your audience trusts your recommendations
- Sponsored posts feel natural inside relevant content
Even small blogs can attract sponsored opportunities if the niche is focused.
4. Sell Digital Products (Your Own Passive Income Stream)
Digital products are a great way to earn money without inventory or shipping.
You can sell:
- E-books
- Printable planners
- Templates (social media, blog planners)
- Digital guides
- Courses
- Stock photos (if you’re into photography)
These products are easy to deliver and scale beautifully over time.
5. Offer Services (Start Earning Fast)
If you want to earn quickly, offering services is one of the fastest ways.
Examples:
- Freelance writing
- Website setup for beginners
- Social media management
- WordPress maintenance
- SEO consultations
You can add a Service Page to your blog and start getting inquiries.
6. Build an Email List and Send Newsletters
Email marketing helps you:
- Build trust
- Promote new blog posts
- Recommend products
- Sell your own offers
Even if you’re a beginner, start collecting emails early.
A strong email list can become a long-term revenue generator.
7. Use Your Blog to Promote Your Own Tools or Products
If you have your own tool, like your WordPress AI writing plugin, your blog becomes the perfect platform to showcase it.
You can:
- Add tutorials
- Place CTAs in relevant posts
- Share case studies
- Offer lead magnets or free trials
As your audience grows, your blog becomes a powerful marketing asset.
You don’t need to use every monetization method at once. Start with one or two, learn what works for your niche, and scale from there. Successful bloggers focus on building trust first; income follows naturally.
Why Using an AI Writing Plugin Makes Blogging Easier
If you’re learning how to start a WordPress blog, one thing becomes clear very quickly: Setting up your blog is the easy part; creating consistent, high-quality content is the real challenge.
You might have tons of ideas one day… and absolutely none the next. Or maybe you start writing but get stuck halfway through the introduction. Or worst of all, you spend hours writing a post only to feel unsure about the quality.
This is exactly why many beginners rely on AI-powered WordPress writing tools to speed up the process and stay consistent, without losing authenticity.
Modern AI writing plugins don’t just “generate text”; they support your entire blogging workflow, from topic selection to publishing. Let’s break down how these tools simplify your journey.
1. SERP-Based Outline Generator
Instead of guessing what to include in your blog post, AI tools can analyze top-ranking articles and create a SERP-based outline. This helps you structure your content around what readers and search engines expect.
Perfect for posts like “How to Start a WordPress Blog”, where search intent matters.
2. AI Outline Generation & Topic Analysis
Simply enter your blog topic, and the tool generates smart, well-organized outlines.
Some tools even analyze:
- Your target audience
- Their pain points
- What type of content they prefer
This makes your writing more relevant and more engaging right from the start.
3. Guided Long-Form Blog Workflow
If you’re intimidated by writing long, in-depth posts, a guided workflow helps you move step-by-step:
- Start with your topic
- Generate an outline
- Expand sections
- Refine tone
- Add examples
- Finalize structure
It feels like having a writing mentor inside your WordPress dashboard.
4. Define Advanced Blog Parameters
To create content that truly matches your brand, AI tools let you set advanced options like:
- Audience type (beginners, experts, busy entrepreneurs, etc.)
- Content purpose (educate, convert, inspire, entertain)
- Tone of voice (friendly, professional, conversational, witty, etc.)
- Brand angle or unique POV
This ensures every post feels intentional and aligned with your blog identity.
5. Smart Title Generation & Regeneration
Struggling to come up with a catchy title? AI can generate multiple title ideas or rewrite your existing one for:
- Better SEO
- Higher click-through rate
- More clarity
Perfect when you want to stand out in search results.
6. Brand Voice Training
Consistency builds trust, and modern AI tools help you maintain it. You can feed the AI:
- Text snippets
- Writing samples
- Existing WordPress content
The tool studies your voice and adapts its writing to match it. So, even when AI helps, your content still sounds like you.
7. Regenerate Any Section with Custom Prompts
Stuck on a paragraph?
Need a smoother explanation?
Want more examples, details, or a different tone?
Just highlight the section → enter your custom prompt → regenerate. This is a game-changer for polishing your article without rewriting everything manually.
8. Built-In AI Image Generation (Visuals Without Extra Tools)
Instead of searching for stock photos or opening separate design tools, you can generate:
- Featured images
- Blog graphics
- Illustrations
- Social media assets
…directly inside WordPress.
This saves time and keeps your visuals consistent with your content.
9. Create & Schedule Social Media Posts (All in One Place)
After publishing a post, you can turn it into:
- Social captions
- Carousel scripts
- Twitter threads
- LinkedIn posts
And schedule them, right from the same interface. This turns one blog post into multiple marketing assets without extra effort.
10. Send Publish-Ready Blog Posts Directly to WordPress Drafts
Finally, when everything looks perfect, you can export your blog post straight into your WordPress drafts, already formatted, structured, and SEO-ready.
This eliminates copy-paste issues and keeps your workflow smooth.
Your WordPress Blog Journey Starts Today
You’ve now learned everything you need to confidently start a WordPress blog, from picking your niche and setting up hosting to customizing your design, writing your first post, and optimizing it for SEO. What once felt overwhelming is now a clear, step-by-step path you can follow at your own pace.
And this is where the real journey begins. Starting a blog isn’t just about installing WordPress or choosing a theme; it’s about showing up, creating content, and watching your ideas turn into something meaningful. Whether you want to share your story, build a brand, attract an audience, or eventually monetize your blog, you now have the foundation to move forward with confidence.
As you continue, remember that blogging is a process of growth. Every post you write makes you better. Every improvement you make brings you closer to your goals. With consistency, the right tools, and a little creativity, your blog can become something truly powerful.
You’re ready. Open your WordPress dashboard, start writing, and take your first step. Your WordPress blogging journey starts today.
FAQs
What is WordPress?
WordPress is a free content management system (CMS) that lets you build and manage any type of website, from simple blogs to online stores and business sites.
How much does starting a WordPress blog cost?
It depends on your setup. A domain usually costs around $10–$15 per year, and hosting can be as low as $2–$5 per month with providers like Bluehost, Hostinger, or DreamHost. Many beginners start a blog for under $50 in the first year.
Can I start blogging without coding?
Yes, you can start a blog without coding. Platforms like WordPress.com, Wix, and Blogger offer templates and drag-and-drop tools, making it easy to design your site, add content, and publish posts with no technical skills required.
How soon can I make money blogging?
You can’t make money from a blog instantly. Most bloggers take several months to a year to see income, though some may start earning small amounts within the first few months.
Should I start on WordPress.com or self-hosted WordPress (WordPress.org)?
If you want full control, customization, and the ability to monetize, go with self-hosted WordPress.org. WordPress.com is more limited unless you pay for higher-tier plans. For most serious bloggers, self-hosting is the best long-term choice.
This page was last edited on 1 April 2026, at 12:05 pm